One of the perks to Yeoldfurt's job is access to a lot of free material. Every week, the company discards several heavy wooden crates and pallets. The materials to be thrown away are left in a designated area near the loading dock and anyone who wants them is welcome to take them. Yeoldfurt hauls something useful home almost every week.
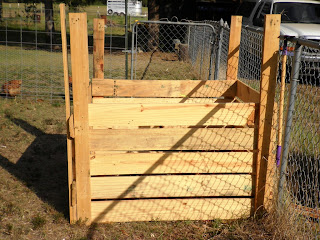
He has been disassembling the crates and pallets and stacking the lumber according to size and thickness. A couple of weeks ago, he used some of this free material to build us a really nice compost box. Before he started building it, we talked about what size it should be and where we should put it. We've had it for about two weeks now and, so far, I think we made some good choices. It's four feet square and the sides are about three feet tall. He set it up against the chainlink fence between the garden and the chicken coop. We figured that would be a convenient location both for putting new material in the box, and for getting material out of the box when it was time to build up the garden.
This is what it looks like. Notice that the four corner posts extend about two feet higher than the walls. He did that on purpose so that it would be easily expandable. If we run out of room, more boards can be added to the walls without him having to disassemble and reconstruct the whole box.
But then he got fancy. He built the front so that only the bottom board on that wall is permanently affixed. All the boards above it can be removed to lower the side. That will make shoveling material out of the box a whole lot easier on our backs.
Fire ants are a constant problem here, so the first thing we put in the bin was a thick layer of cedar mulch. Most bugs, including fire ants, don't like cedar. I don't think it's poisonous but it's not inviting to them either, so hopefully it will minimize their presence. After the layer of cedar mulch was in, Yeoldfurt pulled all of the old hay out of the chicken coop and piled it on top of the cedar. We put the hay in the coop in December to help the chickens stay warm through the winter. It was 'well-seasoned' and should be a bonus to our composting efforts.
My next problem was figuring out how to easily and efficiently gather household scraps on a daily basis to add to the compost. It's only the two of us and we only eat one meal at home on week days, so there isn't much to gather on a day to day basis. I didn't want to make too much of a chore out of 'feeding' the compost. I'm not looking for any new chores and if it's not convenient, it might not happen regularly. I also didn't want to deal with odors or a potential accidental spill if I accumulated too much before dumping the scraps. So here's what I came up with ...
I got one of the plastic coffee containers out of storage, the kind with the handle molded into one corner and a tight-fitting lid. I labeled it on the handle and the front and the lid 'COMPOST' and I keep it under the sink in my kitchen. Every night when I wash the coffee pot, I dump the old grounds in the can. When I crack an egg, the shell goes in the can. When I trim vegetables, the trimmings go in the can. Left over vegetables go in the can. Pretty much everything except meat goes in the can.
The coffee can is heavy plastic, very sturdy and easy to handle and has a tight-fitting lid so I don't have to worry about odor or spills. A bonus that I realized after the first week is that coffee grounds are a natural odor deterrent. I guess I knew that at one time but now it has real relevance. The last time I emptied the can, it had four days worth of coffee grounds, some bell pepper and onion trimmings, leftover corn and green beans and three egg shells. But the only thing I could smell when I opened the lid was the coffee grounds. What a plus!
Since keeping a compost pile wet is necessary for it to do it's job, I also started adding a little water to the can each time I put something in it. When I empty the can, I add water to within two inches of the top before I take it out to the compost bin. I give it a good swirl before I dump it which helps rinse the can. The added water with each deposit of scraps is good for the composting process so it's a win-win.


No comments:
Post a Comment